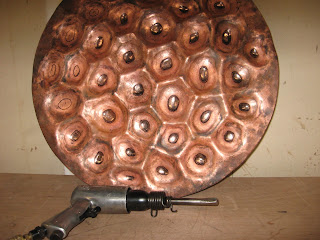
When copper is deformed it becomes rigid and inflexible. This is known as work hardening. Heating copper to temperatures near it's melting point relieves internal stresses and renders the material soft and pliable. This process is called annealing.
The depth, or relief, in this piece was achieved by pushing the metal around from the front and back sides of the design, annealing as needed. Pushing the metal out from the back side is called repousse. Moving the metal down by impacting the front side is called chasing.
I began by cutting a large disk out of 16 gauge copper sheet. I annealed the metal and cleaned off the dark oxides left by the torch. I marked the areas which would be driven down from the front side (chased) with a sharpie.
I formed shallow craters by hammering inside the sketched out shapes, working the metal directly on my wooden table.
In this scenario the metal inside of the craters is work hardened.
While the craters are all work hardened, the areas in between them are still flexible. I pushed these areas out from the back side (repousse) to establish some high points. The shiny lines in this photo are the areas that were just hammered.
I turned the piece back over to work from the front. The metal in the center of the craters is being stretched by the hammer. I had to be careful not to push too far, or risk breaking through the thinning sheet.
In this photo the basic high and low points have been established.
Next, I began shaping the ridges by hammering them in from the sides, towards the center of the raised peaks. Forming a crease or sharp point from an undefined raised area like this is called acumination.
 The color in this photo is the result of annealing. Heating copper causes the metal to form oxides on it's surface. These oxides are messy and troublesome and need to be removed, unless they are intended to be part of the sculpture's finish. Copper is normally cleaned with something acidic or by mechanically scrubbing the surface. I clean copper with a weak sulfuric acid and water mixture, but have also used vinegar or lemon juice with decent results, although it is considerably slower.
The final bit of forming was adding a secondary inner ring within each crater. This was done by chasing these areas with the air hammer. The pneumatic tool has a variable speed adjustment which I was constantly playing with. The metal is never struck very aggressively, as that would thin it too much. Instead the metal is pushed around slowly in small amounts.
The sculpture was chemically colored with liver of sulfur (or sulfur potash). This is called a patina. I will be discussing finishes in a later post. The completed piece is 25 inches in diameter and relatively lightweight.

Coral inspired copper wall sculpture by Jeremy Maronpot
Here is a video slideshow of the process


Wow. Im so impressed and amazed with your work. I love its design, so creative and detailed. Keep up the good work.
ReplyDelete